Mulai besok, tanggal 27 September 2008 sampai tanggal 5 Oktober 2008, saya tidak online. Sedang mudik ke kampung halaman, Sumedang-kota sejuta tahu...
Maklum, di pegunungan tidak ada koneksi internet.hehehe...
Bagi semua pengunjung www.sudarma.info, terima kasih atas kunjungan Anda selama ini. Bila ada kata yang kurang berkenan, baik pada semua artikel di blog ini maupun ketika menyampaikan komentar, saya memohon maaf yang sebesar-besarnya.
Mudah-mudahan silaturahmi kita tetap terjaga dengan baik.
Selamat hari raya idul fitri.
Sampai ketemu lagi tanggal 6 Oktober 2008.
26.9.08
Mohon maaf lahir dan bathin
25.9.08
Pesan Terusan: Setitik Melamin di Susu Cina
Heboh susu mengandung melamin di Cina, yang menyebabkan 53 ribu bayi sakit ginjal, akhirnya sampai juga ke Indonesia. Senin lalu, 22 September, Menteri Kesehatan Siti Fadilah Supari menarik susu bubuk merek Guozhen produksi Cina. Sehari kemudian, Badan Pengawas Obat dan Makanan mengeluarkan surat edaran agar Asosiasi Peretail Indonesia mengamankan 28 jenis makanan yang mengandung susu asal Cina.
KRONOLOGI:
Desember 2007: Perusahaan susu Sanlu Group, Cina, menerima keluhan produk mereka membuat bayi sakit.
Juni 2008: Sanlu menemukan susu bubuknya mengandung melamin.
30 Juni 2008: Lima bayi di Hunan sakit batu ginjal karena susu Sanlu.
11 September 2008: Sanlu, yang sahamnya dikuasai Fonterra, Selandia Baru, menarik 700 ton susu formula.
21 September 2008: Departemen Kesehatan Cina mengumumkan 53 ribu bayi sakit dan empat meninggal karena susu beracun itu.
22 September 2008: Departemen Kesehatan RI menarik susu Guozhen produksi Cina.
23 September 2008: Badan Pengawas Obat dan Makanan mengumumkan 28 jenis makanan yang mengandung susu asal Cina.
APAKAH MELAMIN ITU
Melamin adalah bahan kimia berbasis organikyang banyak ditemukan dalam bentuk kristal putih dalam nitrogen. Biasanya digunakan sebagai bahan campuran plastik dan pupuk. Melamin tak punya nilai nutrisi, tapi kaya nitrogen, sehingga bila dicampur dengan susu akan membuat kadar protein susu seolah lebih tinggi ketimbang aslinya.
Jadi hati-hati ya Ayah, biar Banyu tetap sehat.
Produk yang ditarik dari peredaran:
- Jinwel Yougoo Susu Fermentasi Rasa Jeruk
- Jinwel Yougoo Aneka Buah
- Jinwel Yougoo tanpa Rasa
- Guozhen susu bubuk full cream
- Meiji Indoeskrim Gold Monas Rasa Cokelat
- Meiji Indoeskrim Gold Monas Rasa Vanila
- Oreo Stick Wafer
- Oreo Stick Wafer (disebut dua kali, karena ukuran berbeda)
- Oreo Cokelat Sandwich Cookies
- M&M's Kembang Gula Cokelat Susu
- M&M's Cokelat Susu
- Snicker's (biskuit-nougat lapis cokelat)
- Dove Choc Kembang Gula Cokelat
- Dove Choc
- Dove Choc (disebut dua kali, karena ukuran berbeda)
- Natural Choice Yoghurt Flavoured Ice Bar
- Yili Bean Club Matcha Red Bean Ice Bar
- Yili Bean Club Red Bean Ice Bar
- Yili Prestige Chocliz
- Yili Chestnut Ice Bar
- Nestle Dairy Farm UHT Pure Milk
- Yili High Calcium Low Fat Milk Beverage
- Yili High Calcium Milk Beverage
- Yili Pure Milk 205 ml
- Yili Pure Milk 1 L
- Dutch Lady Strawberry Flavoured Milk
- White Rabbit Creamy Candy
- Yili Choice Dairy Frozen Yoghurt Bar (kembang gula)
Mengerjakan tugas matematika di microsoft word 2007
Salah satu pembaca artikel ini menanyakan, apakah sudah ada software yang bisa diinstal selain situs? Saat itu, saya jawab, saya belum menemukannya. Ternyata, Microsoft word 2007 sudah punya add in untuk menyelesaikan rumus-rumus matematika. Jadi, sekarang bisa dikerjakan di rumah tanpa harus terhubung ke internet.
Kelebihannya disbanding artikel sebelumnya, yaitu:
Proses pengerjaannya tentu lebih cepat. Karena tidak lagi tergantung kualitas koneksi internet.
Membuat rumusnya lebih mudah. Karena bisa menggunakan fasilitas equation yang sudah dimiliki Microsoft Word 2007.
Tidak perlu lagi menerjemahkan ke bahasa Indonesia.
Kalau Anda berminat, silakan download di sini.
Setelah didownload dan diinstal, Anda bisa mencobanya.
Misalnya, saya memiliki dua buah persamaan..png)
.png)
Cara membuat persamaan tersebut adalah sebagai berikut:
Klik tab menu Add-ins. Kemudian, klik toolbar Math, lalu pilih Insert New Equation.
.png)
Masukkan rumusnya.
.png)
Untuk memasukkan rumus yang kedua, ulangi langkah dari awal.
.png)
Sorot kedua persamaan tersebut, lalu klik kanan > Solve for x,y.
.png)
Hasilnya seperti gambar berikut.
.png)
Jika ingin membuat grafiknya, untuk persamaan pertama, sorot persamaan tersebut, lalu klik kanan > Plot Both Sides in 2D.
.png)
Klik Insert.
.png)
Berikutnya, klik kanan persamaan kedua, lalu klik Plot in 2D.
.png)
Klik Insert.
.png)
Hasilnya, seperti gambar berikut.
.png)
Mudah bukan? Kalau yang sederhana sudah bisa, sekarang coba yang lebih rumit.
Misalnya:
.png)
Jawabannya perlu disederhanakan lagi.
18.9.08
Mencari video tutorial di youtube
Bagi pemula, kadang males membaca artikel atau buku untuk mempelajari computer. Memang, sekarang buku sudah menyediakan video tutorial. Tentu saja videonya hanya yang dibahas di dalam buku saja. Setelah selesai melihatnya, tentu masih bingung mau mengerjakan apa lagi.
Sebenarnya, kita bisa mendapatkan video tutorial secara gratis di internet. Salah satunya di youtube. Kita bisa mendapatkan tutorial yang kita inginkan. Tentu saja kebanyakan berbahasa Inggris. Namun, tidak perlu khawatir. Meskipun tidak paham bahasa Inggris, dengan video, kita masih bisa mengikuti langkah-langkahnya hanya dengan melihat pergerakan mouse.
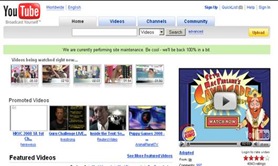
Jika Anda memerlukannya, silakan buka youtube.
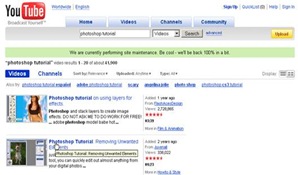
Ketik tutorial yang Anda inginkan, misalnya: photoshop tutorial.
Klik Search. Hasilnya seperti gambar berikut.
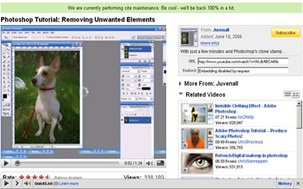
Klik salah satu video yang Anda inginkan.
Sekarang Anda bisa menyaksikan video tutorial yang Anda inginkan. Jika ingin mendownloadnya, silakan baca artikel ini.
16.9.08
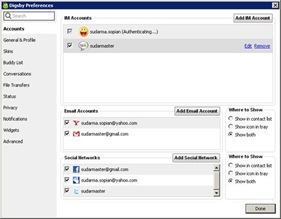
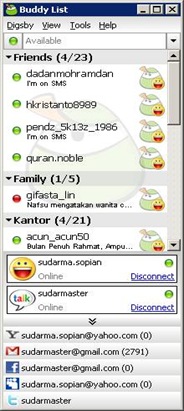
Digsby: Chatting+Email+Social Network dalam satu aplikasi
Setiap orang yang menggunakan internet, pasti tidak akan terlepas dari tiga hal: chatting, email, dan jaringan social. Banyak aplikasi maupun situs yang menyediakan ketiga hal tersebut. Tentu saja, akan cukup merepotkan karena harus membuka lebih dari satu aplikasi untuk chatting, aplikasi atau browser untuk membuka email, dan banyak browser untuk membuka situs jaringan social.
Lalu, bagaimana jika ada sebuah aplikasi yang mampu menyediakan ketiga hal di atas? Tentu saja ini sangat bermanfaat. Kita bisa menghemat waktu membuka aplikasi atau browser, ruang desktop tidak akan terlalu penuh, dan tentu saja akan menghemat biaya bila menggunakan koneksi internet dengan volume base. Dengan aplikasi ini, kita bisa chatting menggunakan Yahoo! Messenger, Gtalk, AIM, MSN, ICQ, Facebook,dan Jabber. Email yang kita bisa buka di antaranya: Yahoo, Gmail, Hotmail, AOL, bahkan bisa POP dan IMAP. Jaringan social yang bisa kita buka, di antaranya: Facebook, MySpace, dan Twitter.
Mau nyoba? Silakan download aplikasinya di sini.
- Setelah didownload dan diinstal, buka aplikasi tersebut dan login (daftar dulu di sini).
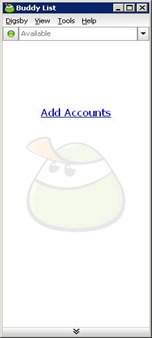
- Setelah berhasil login, klik Add Account.
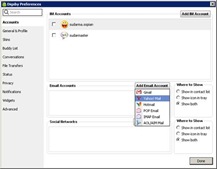
- Jika ingin chatting, klik Add IM Account. Tinggal dipilih akan menggunakan aplikasi chatting yang disediakan.
- Login sesuai aplikasi chatting yang dipilih, misalnya: Yahoo! Messenger. Klik Save.
- Ulangi langkah di atas bila ingin membuka aplikasi chatting yang lain.
- Jika ingin membuka email, klik Add Email Account.
- Login dengan menggunakan id email yang Anda pilih, misalnya: Yahoo. Klik Save.
- Ulangi langkah di atas untuk membuka email yang lain.
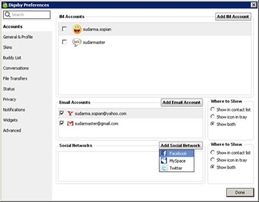
- Jika ingin membuka situs jaringan sosial, klik Add Social Network.
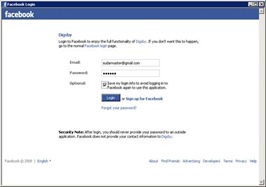
- Login sesuai situs jaringan sosial yang Anda pilih, misalnya: Facebook.
- Ulangi langkah di atas untuk membuka situs jaringan sosial yang lain.
- Setelah selesai semua, ceklis semua account yang Anda pilih. Secara otomatis akan mengakses semua layanan yang akan digunakan.
- Jika semua selesai, klik tombol Done. Sekarang, kita bisa chatting, membuka email, menambah teman, dalam satu aplikasi.
Hebat bukan? Kita bisa menghemat ruang, waktu, dan biaya tanpa harus mengurangi aktivitas utama ketika berinternet.
Selamat mencoba!
15.9.08
Punya PR matematika yang susah? Temukan jawabannya di sini
Waktu masih sekolah, paling males berangkat kalau ada pelajaran matematika. Apalagi pas ada tugas yang ga ngerti. Jalan terakhir, datang paling pagi, trus nyontek temen yang sudah beres.
Kalau setiap ada tugas seperti itu, tentu malu dong.
Kini, masalah seperti itu bisa dengan cepat diatasi. Kita tinggal masukin aja soalnya, lalu klik tombol untuk menjawab. Setelah itu, biarkan saja system mengerjakannya. Jika proses perhitungan sudah selesai, hasil beserta langkah-langkahnya akan tampil, termasuk grafiknya bila diperlukan. Enak bukan? Kenapa ga dari dulu ya menciptakan software seperti ini? Setiap ada tugas matematika, pasti nilainya selalu bagus.
Mau tau caranya? Silakan ikuti langkah berikut.
Buka http://www.mathway.com/.
Masukkan soal yang ingin diselesaikan di bagian Enter problem.
Jika ingin melihat fotmat matematikanya, klik tombol Show pada bagian Math format.
Pilih jawaban seperti apa yang diinginkan pada bagian select topic.
Klik tombol Answer.
Tunggu proses pengerjaan beberapa saat. Hasil beserta langkah-langkahnya akan ditampilkan seperti gambar berikut.
Jika ingin melihat grafik, gulung layar ke bawah. Klik Graph this solution.
Grafik dari soal tersebut akan tampil seperti gambar berikut.
Hebat yah? Bagi guru matematika yang mau bikin pusing muridnya, bisa menggunakan web ini. Masukin aja soal yang susah-susah. Ga perlu repot mencoba, tinggal dimasukan soalnya, jawabannya akan langsung keluar.
Setiap masalah pasti ada solusinya. Jangan pernah takut mencoba sesuatu yang belum pernah kita lakukan.
12.9.08
Create forms that users complete in Word
Starting with a template, you can add content controls and instructional text in Microsoft Office Word 2007 to quickly and easily create a form that you can send to others to fill out using Office Word 2007 on their computer. In an advanced scenario, any content controls that you add to a form can also be linked to data.
You can also create a form by starting with a sample template. Many are available on the Microsoft Office Online Web site.
Note You can print a form that was created by using content controls in Office Word 2007, but the boxes around the content controls will not be printed.
What do you want to do?
Step 1: Set up Word for creating forms
- Click the Microsoft Office Button
 , and then click Word Options.
 - Click Popular.
- Select the Show Developer tab in the Ribbon check box, and then click OK.
Step 2: Open a template or a document on which to base the form
- Click the Microsoft Office Button
![clip_image001[1]](//lh5.ggpht.com/sudarmaster/SMnwUkNRwxI/AAAAAAAAA0g/3aXvRWA9b_Y/clip_image001%5B1%5D_thumb.gif?imgmax=800) , and then click New.
, and then click New. - Under Templates, click My templates.
- Double-click Normal, and then click Template or Document under Create New.
- Click the Microsoft Office Button
![clip_image001[2]](//lh6.ggpht.com/sudarmaster/SMnwWvNWbHI/AAAAAAAAA0o/-a60Mv_06pQ/clip_image001%5B2%5D_thumb.gif?imgmax=800) , and then click Save As.
, and then click Save As. - In the Save As dialog box, give the new template or document a file name, and then click Save.
Step 3: Add content controls to the form
Design the form by sketching a layout first, or use an existing form as a guide. In your form, you can add content controls, tables, and other graphics elements.
On the Developer tab, in the Controls group, click Design Mode, and then click where you want to insert a control.
Do any of the following:
Insert a text control where users can enter text
Insert a drop-down list that restricts available choices to those you specify
1. On the Developer tab, in the Controls group, click the Drop-Down List control ![]() .
.
2. Select the content control, and then on the Developer tab, in the Controls group, click Properties.
3. To create a list of choices, under Drop-Down List Properties, click Add.
4. Type a choice in the Display Name box, such as Yes, No, or Maybe.
Repeat this step until all of the choices are in the drop-down list.
Step 4: Set or change properties for content controls
Each content control has properties that you can set or change. For example, the Date Picker control offers options for the format you want to use to display the date.
- Right-click the content control that you want to change.
- Click Properties, and change the properties that you want.
Step 5: Add instructional text to the form
Instructional text can enhance the usability of the form you create and distribute. You can change the default instructional text in content controls.
To customize the default instructional text for your form users, do the following:
1. On the Developer tab, in the Controls group, click Design Mode.
2. Click the content control where you want to revise the placeholder instructional text.
3. Edit the placeholder text and format it any way you want.
4. If you want the content control to disappear when someone types in their own content to replace your instructions in a Rich Text control or a Text control, click Properties in the Controls group, and then select the Remove content control when contents are edited check box.
5. On the Developer tab, in the Controls group, click Design Mode to turn off the design feature and save the instructional text.
Note Do not select the Contents cannot be edited check box if you want form users to replace the instructional text with their own text.
You can protect individual content controls in a template to help prevent someone from deleting or editing a particular content control or group of controls, or you can help protect all of the template content with a password.
Tip If you want, you can test the form prior to distributing it. Open the form, fill it out as the user would, and then save a copy in a location that you want.
Protect parts of a form
1. Open the form that you want to protect.
2. Select the content control or the group of controls to which you want to restrict changes.
To group several controls, select the controls by pressing SHIFT and clicking each control that you want to group. On the Developer tab, in the Controls group, click Group, and then click Group.
3. On the Developer tab, in the Controls group, click Properties.
4. In the Content Control Properties dialog box, under Locking, do either of the following:
§ Select the Content control cannot be deleted check box, which allows the content of the control to be edited but the control itself cannot be deleted from the template or a document that is based on the template.
§ Select the Contents cannot be edited check box, which allows you to delete the control but does not allow you to edit the content in the control.
Note This option is not available for all controls.
Protect all of the contents of a form
1. Open the form that you want to help protect.
2. On the Developer tab, in the Protect group, click Protect Document, and then click Restrict Formatting and Editing.
3. In the Protect Document task pane, under Editing restrictions, select the Allow only this type of editing in the document check box.
4. In the list of editing restrictions, select Filling in forms.
5. Under Start enforcement, click Yes, Start Enforcing Protection.
6. To assign a password to the document so that only reviewers who know the password can remove the protection, type a password in the Enter new password (optional) box, and then confirm the password.
Important If you choose not to use a password, anyone can change your editing restrictions.
Use strong passwords that combine uppercase and lowercase letters, numbers, and symbols. Weak passwords don't mix these elements. Strong password: Y6dh!et5. Weak password: House27. Passwords should be 8 or more characters in length. A pass phrase that uses 14 or more characters is better. For more information, see Help protect your personal information with strong passwords.
It is critical that you remember your password. If you forget your password, Microsoft cannot retrieve it. Store the passwords that you write down in a secure place away from the information that they help protect.
11.9.08
Tampilkan blog Anda di handphone
Anda suka internetan di handphone? Saat browsing menggunakan handphone, kadang kita ingin membuka blog kita sendiri. Namun, kalau fitur handphonenya masih sederhana, sulit sekali membukanya. Kecuali kalau handphonenya sudah 3G.
Lalu, bagaimana caranya supaya blog kita bisa dibuka dengan mudah di handphone yang hanya memiliki fitur gprs? Ada sebuah web yang bisa membuat blog kita bisa dibuka dengan mudah di handphone.
Mau nyoba? Silakan ikuti langkah berikut.
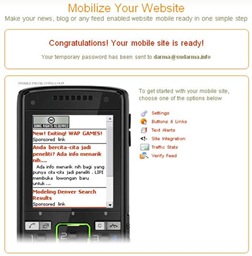
Klik di sini.
Masukkan alamat blog/website dan alamat email kamu, lalu ceklis I have read and agree to the terms of use. Klik Submit.
Buka email Anda untuk melakukan verifikasi. Kalau tidak ada di inbox, silakan buka folder Spam (jika menggunakan Gmail) atau folder Bulk mail (jika menggunakan Yahoo! Mail).


![Social Media Marketing: Facebook dan Instagram [edisi bundling]](https://blogger.googleusercontent.com/img/b/R29vZ2xl/AVvXsEh_6sc5Kd-GwaY4IuUVBe7vHZnhyphenhyphen56oQ_VlWK52nStY1Jy2lFdc-ycrHVdkl1CUKxoT-p35rPbsTK49Nt19rmRAAtEW5Azh0EcpQXWichrrQ4cqlhWA9lnGrezGjBLcnfMaFmZlD1qxFWg/s320/social-media-marketing.jpg)
![WebMaster: WordPress dan Prestashop [edisi bundling]](https://blogger.googleusercontent.com/img/b/R29vZ2xl/AVvXsEj85mlRGUL32GrcyX8totCj_JCzEwCZoCwm_3EVncYAxNm8L2reQMHzV0ODS6CFBGgzARtzYsRxtmAaxhAqsCdmbjbCVvSnrYEgDxrtIR5S3TPuXau5tkppJDCFnlqALlOFwzgZN09oj1s/s320/webmaster.jpg)






![clip_image008[1]](http://lh6.ggpht.com/sudarmaster/SM8bz4mviHI/AAAAAAAAA5Y/Sh2LuXCLTr4/clip_image008%5B1%5D_thumb%5B1%5D.jpg?imgmax=800)


![clip_image002[1]](http://lh3.ggpht.com/sudarmaster/SMnwjO15ggI/AAAAAAAAA1Q/qfrWX1p2ok4/clip_image002%5B1%5D_thumb%5B2%5D.gif?imgmax=800)
![clip_image002[2]](http://lh4.ggpht.com/sudarmaster/SMnwlRFVPgI/AAAAAAAAA1Y/Y8DWK-cQcyM/clip_image002%5B2%5D_thumb%5B1%5D.gif?imgmax=800)
![clip_image002[3]](http://lh3.ggpht.com/sudarmaster/SMnxPLGxCQI/AAAAAAAAA1g/l0l7fMEWZhI/clip_image002%5B3%5D_thumb%5B1%5D.gif?imgmax=800)


