16.9.08

Digsby: Chatting+Email+Social Network dalam satu aplikasi

Setiap orang yang menggunakan internet, pasti tidak akan terlepas dari tiga hal: chatting, email, dan jaringan social. Banyak aplikasi maupun situs yang menyediakan ketiga hal tersebut. Tentu saja, akan cukup merepotkan karena harus membuka lebih dari satu aplikasi untuk chatting, aplikasi atau browser untuk membuka email, dan banyak browser untuk membuka situs jaringan social.

Lalu, bagaimana jika ada sebuah aplikasi yang mampu menyediakan ketiga hal di atas? Tentu saja ini sangat bermanfaat. Kita bisa menghemat waktu membuka aplikasi atau browser, ruang desktop tidak akan terlalu penuh, dan tentu saja akan menghemat biaya bila menggunakan koneksi internet dengan volume base. Dengan aplikasi ini, kita bisa chatting menggunakan Yahoo! Messenger, Gtalk, AIM, MSN, ICQ, Facebook,dan Jabber. Email yang kita bisa buka di antaranya: Yahoo, Gmail, Hotmail, AOL, bahkan bisa POP dan IMAP. Jaringan social yang bisa kita buka, di antaranya: Facebook, MySpace, dan Twitter.

Mau nyoba? Silakan download aplikasinya di sini.

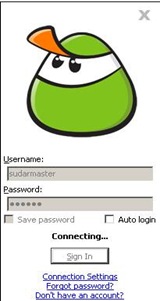
  • Setelah didownload dan diinstal, buka aplikasi tersebut dan login (daftar dulu di sini).

clip_image002

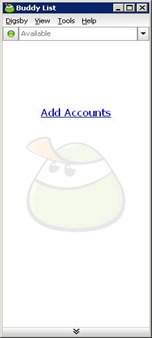
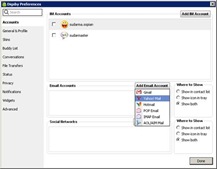
  • Setelah berhasil login, klik Add Account.

clip_image004

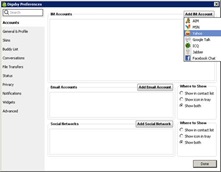
  • Jika ingin chatting, klik Add IM Account. Tinggal dipilih akan menggunakan aplikasi chatting yang disediakan.

clip_image006

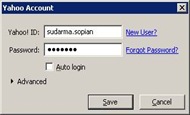
  • Login sesuai aplikasi chatting yang dipilih, misalnya: Yahoo! Messenger. Klik Save.

clip_image008

  • Ulangi langkah di atas bila ingin membuka aplikasi chatting yang lain.
  • Jika ingin membuka email, klik Add Email Account.

clip_image010

  • Login dengan menggunakan id email yang Anda pilih, misalnya: Yahoo. Klik Save.

clip_image008[1]

  • Ulangi langkah di atas untuk membuka email yang lain.
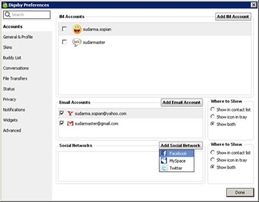
  • Jika ingin membuka situs jaringan sosial, klik Add Social Network.

clip_image012

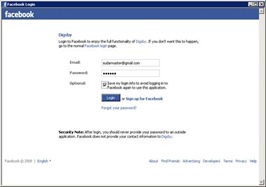
  • Login sesuai situs jaringan sosial yang Anda pilih, misalnya: Facebook.

clip_image014

  • Ulangi langkah di atas untuk membuka situs jaringan sosial yang lain.
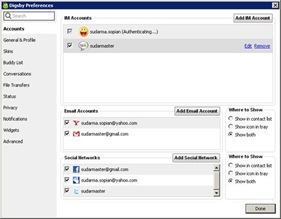
  • Setelah selesai semua, ceklis semua account yang Anda pilih. Secara otomatis akan mengakses semua layanan yang akan digunakan.

clip_image016

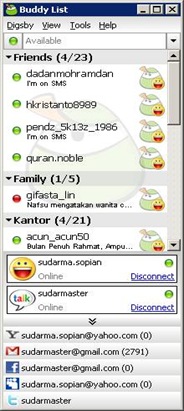
  • Jika semua selesai, klik tombol Done. Sekarang, kita bisa chatting, membuka email, menambah teman, dalam satu aplikasi.

clip_image018

Hebat bukan? Kita bisa menghemat ruang, waktu, dan biaya tanpa harus mengurangi aktivitas utama ketika berinternet.

Selamat mencoba!

15.9.08

Punya PR matematika yang susah? Temukan jawabannya di sini

Waktu masih sekolah, paling males berangkat kalau ada pelajaran matematika. Apalagi pas ada tugas yang ga ngerti. Jalan terakhir, datang paling pagi, trus nyontek temen yang sudah beres.
Kalau setiap ada tugas seperti itu, tentu malu dong. Bisa disangka males atau bodoh. Apalagi kalau lagi ngeceng temen sekelas, gengsi dong kalau ketauan, setiap ada tugas nyontek.

http://www.ebooku.id/2017/10/google-adsense-ala-facebook.html

Kini, masalah seperti itu bisa dengan cepat diatasi. Kita tinggal masukin aja soalnya, lalu klik tombol untuk menjawab. Setelah itu, biarkan saja system mengerjakannya. Jika proses perhitungan sudah selesai, hasil beserta langkah-langkahnya akan tampil, termasuk grafiknya bila diperlukan. Enak bukan? Kenapa ga dari dulu ya menciptakan software seperti ini? Setiap ada tugas matematika, pasti nilainya selalu bagus.

Mau tau caranya? Silakan ikuti langkah berikut.
Buka http://www.mathway.com/.
Masukkan soal yang ingin diselesaikan di bagian Enter problem.


Jika ingin melihat fotmat matematikanya, klik tombol Show pada bagian Math format.
Pilih jawaban seperti apa yang diinginkan pada bagian select topic.

Klik tombol Answer.


Tunggu proses pengerjaan beberapa saat. Hasil beserta langkah-langkahnya akan ditampilkan seperti gambar berikut.


Jika ingin melihat grafik, gulung layar ke bawah. Klik Graph this solution.


Grafik dari soal tersebut akan tampil seperti gambar berikut.


Hebat yah? Bagi guru matematika yang mau bikin pusing muridnya, bisa menggunakan web ini. Masukin aja soal yang susah-susah. Ga perlu repot mencoba, tinggal dimasukan soalnya, jawabannya akan langsung keluar.

Setiap masalah pasti ada solusinya. Jangan pernah takut mencoba sesuatu yang belum pernah kita lakukan.

12.9.08

Create forms that users complete in Word

Starting with a template, you can add content controls and instructional text in Microsoft Office Word 2007 to quickly and easily create a form that you can send to others to fill out using Office Word 2007 on their computer. In an advanced scenario, any content controls that you add to a form can also be linked to data.

You can also create a form by starting with a sample template. Many are available on the Microsoft Office Online Web site.

Note    You can print a form that was created by using content controls in Office Word 2007, but the boxes around the content controls will not be printed.

What do you want to do?

Create a form

Step 1: Set up Word for creating forms

  1. Click the Microsoft Office Button clip_image001, and then click Word Options.
  2. Click Popular.
  3. Select the Show Developer tab in the Ribbon check box, and then click OK.

Step 2: Open a template or a document on which to base the form

  1. Click the Microsoft Office Button clip_image001[1], and then click New.
  2. Under Templates, click My templates.
  3. Double-click Normal, and then click Template or Document under Create New.
  4. Click the Microsoft Office Button clip_image001[2], and then click Save As.
  5. In the Save As dialog box, give the new template or document a file name, and then click Save.

Step 3: Add content controls to the form

Design the form by sketching a layout first, or use an existing form as a guide. In your form, you can add content controls, tables, and other graphics elements.

On the Developer tab, in the Controls group, click Design Mode, and then click where you want to insert a control.

clip_image002

Do any of the following:

Insert a text control where users can enter text

  1. 1. On the Developer tab, in the Controls group, click the Rich Text control clip_image003or the Text control clip_image004.

Insert a drop-down list that restricts available choices to those you specify

1. On the Developer tab, in the Controls group, click the Drop-Down List control clip_image005.

2. Select the content control, and then on the Developer tab, in the Controls group, click Properties.

clip_image002[1]

3. To create a list of choices, under Drop-Down List Properties, click Add.

4. Type a choice in the Display Name box, such as Yes, No, or Maybe.

Repeat this step until all of the choices are in the drop-down list.

Step 4: Set or change properties for content controls

Each content control has properties that you can set or change. For example, the Date Picker control offers options for the format you want to use to display the date.

  1. Right-click the content control that you want to change.
  2. Click Properties, and change the properties that you want.

Step 5: Add instructional text to the form

Instructional text can enhance the usability of the form you create and distribute. You can change the default instructional text in content controls.

To customize the default instructional text for your form users, do the following:

1. On the Developer tab, in the Controls group, click Design Mode.

clip_image002[2]

2. Click the content control where you want to revise the placeholder instructional text.

3. Edit the placeholder text and format it any way you want.

4. If you want the content control to disappear when someone types in their own content to replace your instructions in a Rich Text control or a Text control, click Properties in the Controls group, and then select the Remove content control when contents are edited check box.

5. On the Developer tab, in the Controls group, click Design Mode to turn off the design feature and save the instructional text.

Note    Do not select the Contents cannot be edited check box if you want form users to replace the instructional text with their own text.

Add protection to the form

You can protect individual content controls in a template to help prevent someone from deleting or editing a particular content control or group of controls, or you can help protect all of the template content with a password.

Tip  If you want, you can test the form prior to distributing it. Open the form, fill it out as the user would, and then save a copy in a location that you want.

Protect parts of a form

1. Open the form that you want to protect.

2. Select the content control or the group of controls to which you want to restrict changes.

To group several controls, select the controls by pressing SHIFT and clicking each control that you want to group. On the Developer tab, in the Controls group, click Group, and then click Group.

3. On the Developer tab, in the Controls group, click Properties.

clip_image002[3]

4. In the Content Control Properties dialog box, under Locking, do either of the following:

§ Select the Content control cannot be deleted check box, which allows the content of the control to be edited but the control itself cannot be deleted from the template or a document that is based on the template.

§ Select the Contents cannot be edited check box, which allows you to delete the control but does not allow you to edit the content in the control.

Note    This option is not available for all controls.

Protect all of the contents of a form

1. Open the form that you want to help protect.

2. On the Developer tab, in the Protect group, click Protect Document, and then click Restrict Formatting and Editing.

clip_image006

3. In the Protect Document task pane, under Editing restrictions, select the Allow only this type of editing in the document check box.

4. In the list of editing restrictions, select Filling in forms.

5. Under Start enforcement, click Yes, Start Enforcing Protection.

6. To assign a password to the document so that only reviewers who know the password can remove the protection, type a password in the Enter new password (optional) box, and then confirm the password.

Important  If you choose not to use a password, anyone can change your editing restrictions.

Use strong passwords that combine uppercase and lowercase letters, numbers, and symbols. Weak passwords don't mix these elements. Strong password: Y6dh!et5. Weak password: House27. Passwords should be 8 or more characters in length. A pass phrase that uses 14 or more characters is better. For more information, see Help protect your personal information with strong passwords.

It is critical that you remember your password. If you forget your password, Microsoft cannot retrieve it. Store the passwords that you write down in a secure place away from the information that they help protect.

11.9.08

Tampilkan blog Anda di handphone

Anda suka internetan di handphone? Saat browsing menggunakan handphone, kadang kita ingin membuka blog kita sendiri. Namun, kalau fitur handphonenya masih sederhana, sulit sekali membukanya. Kecuali kalau handphonenya sudah 3G.

Lalu, bagaimana caranya supaya blog kita bisa dibuka dengan mudah di handphone yang hanya memiliki fitur gprs? Ada sebuah web yang bisa membuat blog kita bisa dibuka dengan mudah di handphone.

Mau nyoba? Silakan ikuti langkah berikut.

Klik di sini.

clip_image002

Masukkan alamat blog/website dan alamat email kamu, lalu ceklis I have read and agree to the terms of use. Klik Submit.

clip_image004

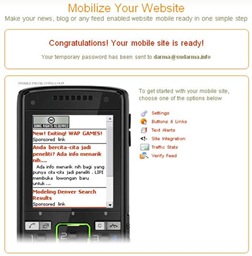
Buka email Anda untuk melakukan verifikasi. Kalau tidak ada di inbox, silakan buka folder Spam (jika menggunakan Gmail) atau folder Bulk mail (jika menggunakan Yahoo! Mail).


10.9.08

Anda bercita-cita jadi peneliti? Ada info menarik nih....


Ada info menarik nih bagi yang punya cita-cita jadi peneliti. LIPI membuka lowongan baru untuk calon peneliti muda. Bagi yang merasa ahli di bidangnya, bolehnyoba nih. Bagi yang ga ahli-ahli banget mendingan ga usah. Tar ada kasus blue energi sama padi supertoy lagi. Big Grin Kecuali kalau mau nebeng image doang....

Persyaratannya masih seperti biasa sangat banyak. Maklum untuk calon peneliti...

Syarat-syarat umum :

  • Warga Negara Republik Indonesia.
  • Bertaqwa kepada Tuhan Yang Maha Esa.
  • Memiliki integritas yang tinggi terhadap, Negara Kesatuan Republik Indonesia.
  • Tidak Berkedudukan sebagai Calon Pegawai Negeri / Pegawai Negeri di instansi lain.
  • Tidak berkedudukan sebagai anggota atau pengurus partai politik.
  • Tidak pernah diberhentikan tidak dengan hormat sebagai Pegawai Negeri atau pegawai swasta.
  • Tidak pernah dihukum penjara berdasarkan putusan pengadilan yang telah mempunyai kekuatan hukum yang tetap.
  • Bersedia ditempatkan di seluruh wilayah Negara Kesatuan Republik Indonesia atau negara lain yang ditentukan pemerintah.
  • Berkelakuan baik.
  • Sehat jasmani dan rohani.

Selain itu, dikenakan juga beberapa syarat khusus untuk CPNS LIPI :

  • Mempunyai kompetensi yang diperlukan.
  • Usia minimal 18 tahun. Usia setinggi-tingginya 27 tahun bagi pelamar berpendidikan D3 dan D4; 30 tahun bagi pelamar berpendidikan S1; dan 35 tahun bagi pelamar berpendidikan S2 dan S3. Batasan usia dihitung berdasarkan rencana penetepan TMT CPNS sesuai ketentuan MenPAN yaitu tanggal 1 Desember 2008.
  • Umur ijasah terakhir setinggi-tingginya 5 tahun untuk ijasah D3 dan D4; 6 tahun untuk ijasah S1, S2, dan S3.
  • Indeks Prestasi Kumulatif minimal bagi pelamar yang berpendidikan S1, S2, dan S3 adalah 2,75; bagi pelamar yang berpendidikan D3 dan D4 adalah 2,70 dengan skala 4,00.

Informasi lengkap silakan klik di sini.

8.9.08

Membuat copyright otomatis

Ketika membuat sebuah website, di bagian footer biasanya suka ditampilkan Copyright ©, disertai tahun pertama kali online dan tahun saat ini. Bagi yang belum tahu, mungkin setiap ganti tahun mengubahnya secara manual. Kalau seperti itu, meskipun setahun sekali, mungkin cukup merepotkan. Padahal, kita bisa membuatnya secara otomatis.


clip_image002[8]

Pada blog ini, angka 2007 adalah pertama kali blog ini dibuat (angka ini tidak berubah), sedangkan 2008 adalah tahun saat ini (akan berubah otomatis saat pergantian tahun).

Jika Anda ingin membuatnya, silakan Copy > Paste script di bawah ini.


Silakan ganti angka 2007 dengan tahun pertama kali website atau blog Anda buat, serta nama dan alamat url web atau blog kamu.

4.9.08

Menghubungkan dua buah laptop


Berbagi file antar computer dalam sebuah jaringan mungkin sudah sering dilakukan. Namun, bagaimana jika kita sedang bekerja/mengerjakan tugas bersama teman yang sama-sama membawa laptop? Tentu saja kedua laptop tersebut harus disambungkan supaya kita bisa berbagi file secara langsung tanpa perangkat lain. Lalu, bagaimana caranya? Kita bisa memanfaatkan fasilitas wireless yang dimiliki oleh laptop.

Cara menyambungkannya sebagai berikut.

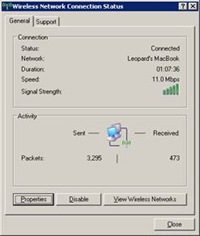
  • Klik dua kali icon Wireless Network Connection yang ada di notification bar.

clip_image002

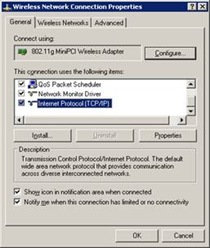
  • Klik Properties.

clip_image004

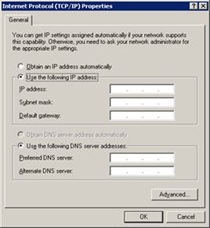
  • Klik dua kali Internet Protocol (TCP/IP).

clip_image006

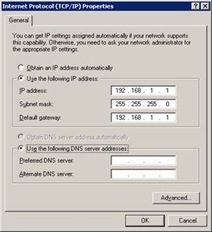
  • Masukkan IP Addres 192.168.1.1, lalu klik tombol Tab. Dengan demikian, Subnet mask akan terisi secara otomatis. Lalu, masukkan Default gateway 192.168.1.1.

clip_image008

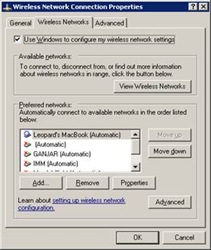
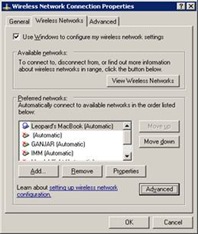
  • Klik OK. Akan kembali ke jendela Wireless Network Connection Properties. Kemudian, klik tab Wireless Networks.

clip_image010

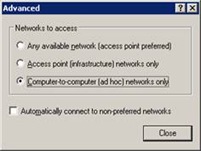
  • Klik Advanced.

clip_image012

  • Klik opsi Computer-to-computer (ad hoc) networks only, lalu klik Close.

clip_image014

  • Klik OK.

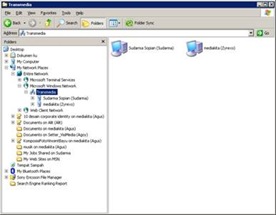
Lakukan hal yang sama pada laptop teman kita. Jika berhasil, kita bisa langsung berinteraksi dengan teman kita, bahkan bisa melakukan remote desktop (mengakses laptop teman pada laptop kita).

clip_image016

Catatan: IP Addressnya dibedakan, kecuali subnet mask dan default gateway. Angka terakhir saja yang diubah, sedangkan tiga angka pertama tetap. Misalnya, 192.168.1.x. Huruf x diganti dengan angka 2 s.d 255.

Mudah, bukan? Selamat mencoba!

Membuka Shared Folder yang Terkunci

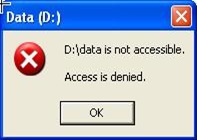
Pernahkah Anda mengalami ketika mengubah permission pada folder yang di-sharing, meng-klik pada bagian Deny? Ketika Anda akan membuka folder tersebut, langsung keluar pesan Access is denied. Isi folder tidak bisa dibuka. Jika propertiesnya dibuka, ukuran foldernya 0 bytes. Walaupun dibuka oleh user Administrator, tetap saja folder tersebut tidak bisa dibuka. Seperti gambar di bawah ini.

clip_image001

Untuk mengatasi masalah tersebut, langkah yang paling mudah adalah dengan cara mengubah hak milik suatu file/folder. Caranya sebagai berikut:

Pertama kali Anda harus mengubah format Folder agar menampilkan format Sharing tingkat lanjut, caranya:

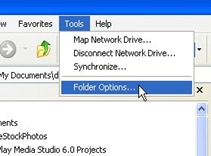
  • Buka Windows Explorer. Klik menu Tools g Folder Options.

folderterkunci (2)

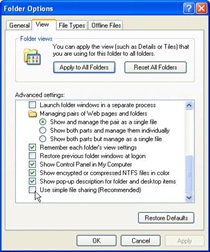
  • Pilih tab View. Pada daftar Advanced settings, cari dan hilangkan centang pada Use simple file sharing.

folderterkunci (3)

  • Klik OK.
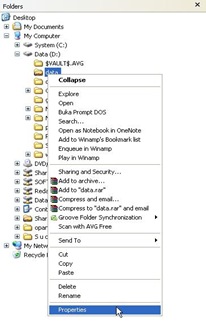
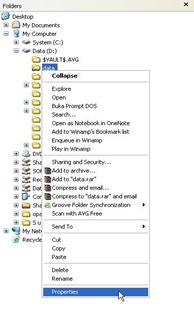
  • Kemudian klik kanan pada file/folder yang dimaksud, lalu pilih Properties.

folderterkunci (4)

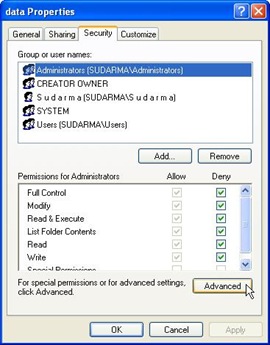
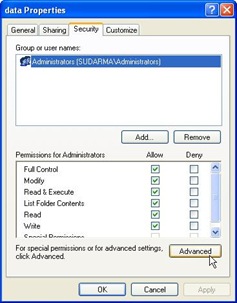
  • Pilih tab Security, lalu klik Advanced.

folderterkunci (5)

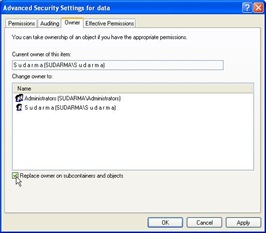
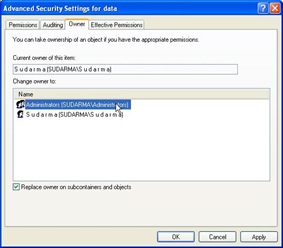
  • Pilih tab Owner. Centang Replace owner on subcontainers and objects.

folderterkunci (6)

  • Lalu di daftar Change Owner To, pilih salah satu (terserah, mau nama Anda atau grupnya).

folderterkunci (7)

  • Klik Apply, lalu OK.
  • Klik OK.

Sekarang Anda telah mengubah kepemilikan. Selanjutnya tinggal mengubah hak akses, caranya:

  • Klik kanan pada file/folder tadi, lalu pilih Properties.

folderterkunci (8)

  • Pilih tab Security, lalu klik Advanced.

folderterkunci (9)

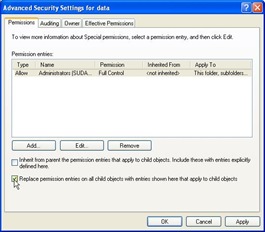
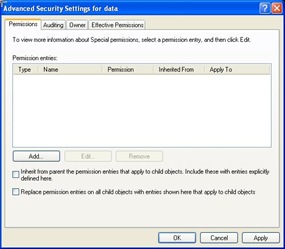
  • Pada tab Permissions, hilangkan centang Inherit from parent the permisson entries that apply to child objects… (Jika tadinya kotak ini tidak dicentang, biarkan apa adanya!). Pada tab yang sama, centang Replace permissons on all child objects.... Klik Apply, lalu OK.

folderterkunci (10)

  • Di daftar Permission entries, Anda hapus semua butir yang ada. Caranya, klik salah satu dari nama yang ada kemudian klik Remove. Ulangi terus hingga daftarnya kosong.

folderterkunci (11)

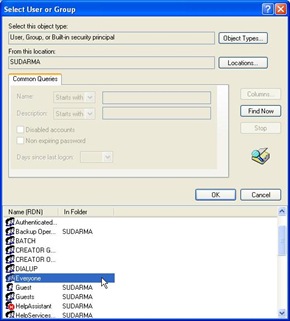
  • Klik Add..., lalu klik Advanced g Find Now. Cari dan klik Everyone, lalu klik OK, dan OK lagi.

folderterkunci (12)

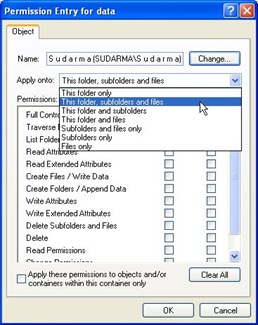
  • Pada Apply onto, pilih This folder, subfolders and files.

folderterkunci (13)

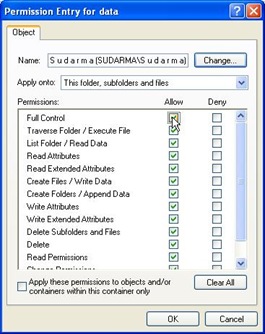
  • Pada Permissions, perhatikan baris Full Control, centang kotak di bawah kolom Allow.

folderterkunci (14)

  • Klik OK, dan OK lagi.

Jika ada beberapa kotak dialog peringatan, cukup klik OK. Jika ada konfirmasi file read-only, cukup klik Yes to All. Begitu seterusnya.